

Flight modes and intelligent orientation control explained
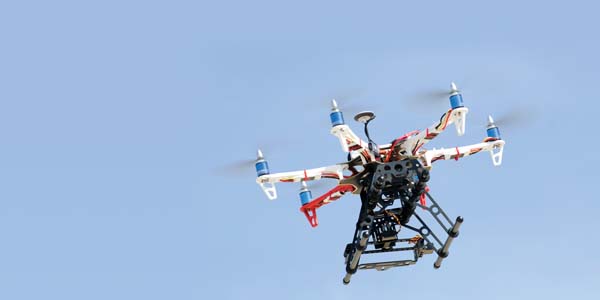
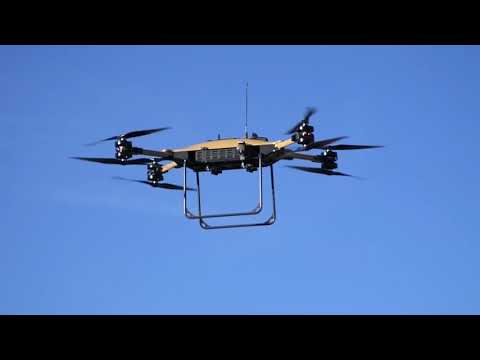
Multirotor aircraft are an excellent platform for aerial photography and video. They are very easy to fly and have very few moving parts. They also don’t produce much vibration and can hover in one exact point for as long as needed. While these aircraft are easy to fly, there are different flight modes that make it a little easier on the pilot. Understanding how and when to use these modes will make flying and getting a good shot almost a sure thing. Let’s take a closer look at flight modes and when and how to use them.
Flight Modes
Many newer rotordrones will have at least three different flight modes: a GPS attitude flying hold mode, an attitude flying hold mode, and a manual flying mode. Each of these modes will exert more or less stability on the drone while flying. When to use them will depend on your flying skills and circumstance. The mode that has the least amount of stability is manual mode.
Manual Mode

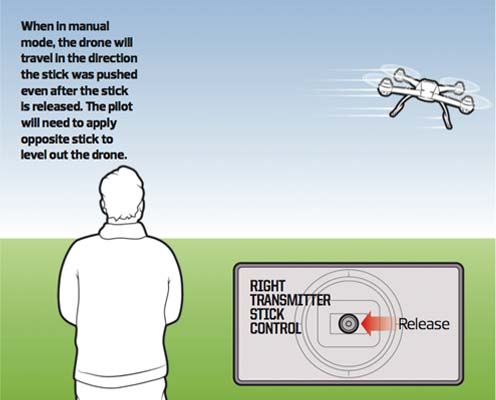
In this mode, the drone will go where you control it and will require you to control it every step of the way. This is the mode to use if you want to do aerobatics with your multirotor because there will be no attitude/angle limitations and no vertical velocity locking, which means you can flip the drone around into any angle. You can’t take your hands off of the sticks in this mode and it will also require all of the corrections during flight to come from the pilot. There will be no assistance from the controller board. Again, this is the perfect mode for performance flying, aerobatics, and any type of flying that demands precise control for the pilot, such as flying obstacle courses in competition or performing loops and rolls.
The downside is that the aircraft will not self-correct when the pilot lets go of the sticks. Any angle or attitude you put the drone into will require you to apply the appropriate stick movement in order to pull the aircraft out of the angle or attitude.
Attitude Holding Mode

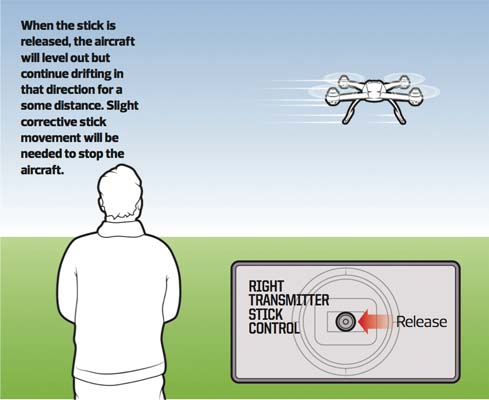
This mode allows the flight controller to use gyro stabilization to keep the attitude of the multirotor level. This means that when you release the sticks and return to center stick, the multirotor will try to level out. However, as it levels out, it will continue to move in the direction that it was flying before the release of the control sticks. In order to stop that momentum, the pilot will have to add corrective stick movements to bring the multirotor to a stop and hover. When flying the multirotor in a hover, the pilot will have to add corrective stick movements to keep the aircraft still and in one position. Many systems will not allow the multirotor to turn more than a 45-degree angle in this mode. In the wind, the quadcopter will still tend to move in the direction the wind is blowing. The pilot will have to add corrected measures to keep the quadcopter standing still at a certain point in the sky.
The nice thing about this mode is that if you get a bit disoriented, you can release the sticks and the multirotor would return to flying flat and level. This is the perfect mode for shooting video because the drone can follow a subject, and if you release the stick, it will level out but continue to drift in that direction. In most filming/shooting attitudes, holding mode will be smooth and there won’t be an abrupt movement in the video. This mode is perfect for the videographer or the person who has a little bit of experience flying multirotor drones.
GPS Attitude Flying Hold Mode

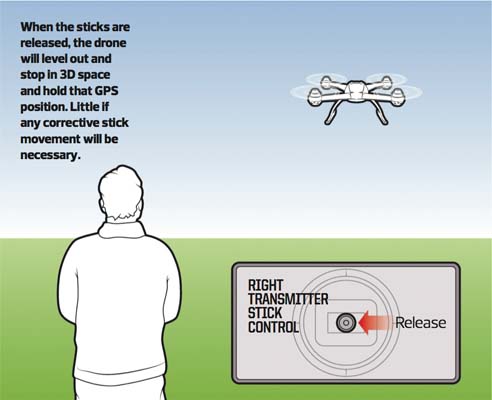
In this mode, the multirotor drone is in constant communication with GPS satellites. This allows the controller to stabilize the drone in three-dimensional space, maintaining altitude and position. In this mode, if you should run into any problems, just release the transmitter sticks and the multirotor will stay in a stationary position until you get your bearings and input a new direction. This mode will also help the drone stay in one position during a windy day. Unlike the previous mode, the GPS mode will stop the forward movement of the multirotor when the sticks are released. There is no need for corrective stick movement in this mode.
This mode is perfect for the photographer who wants to position a drone in a certain spot and take a number of photographs. Of course, because this is a GPS system; it only works outdoors with a clear view of the sky above the drone. This mode can also be used for video, however, because the GPS will try to correct any wind or movement, it could result in some shakiness transferred to the video. This will also depend on how the video camera is attached to the drone.
This mode is perfect for the first-time multirotor pilot who does not have much experience in flying these aircraft. If the pilot becomes disoriented, they can, by simply releasing the sticks, have the aircraft hold this position until the pilot regains their composure.
Intelligent Orientation Control
These last three flight modes mainly deal with the stability of the aircraft. But one of the beauties of these advanced multirotor aircraft is that they have the latest advances in modern technology. This also allows us to control the orientation of the flight in relationship to the pilot. This is another advantage of having GPS technology linked in with our aircraft. Let’s look at these three different modes of intelligent orientation control.
Manual Flying
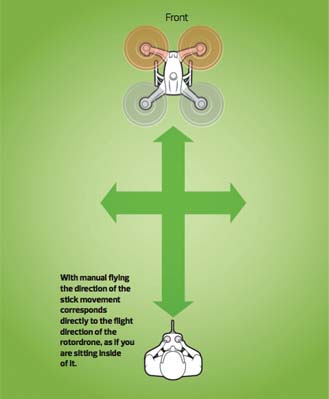

When flying without intelligent orientation control (switch in the off position), the pilot controls the aircraft by where the nose is facing. By pressing the stick forward, the nose of the aircraft moves away from the pilot (assuming the pilot is standing behind the drone and the nose is facing away from the pilot).By pressing the stick to the right, the aircraft moves to the right, and by pressing the stick left, the aircraft moves to the left. This is all good until the multirotor’s nose is facing the pilot, then everything is backwards and can be very disorienting. Flying in this mode requires a pilot with some experience. If the aircraft is some distance away, it is hard to really see where the nose is. Even an experienced pilot can be confused at times while flying with this type of orientation control. It is best to take advantage of the other two intelligent orientation control modes and fly with one of them.
Course Lock Flying
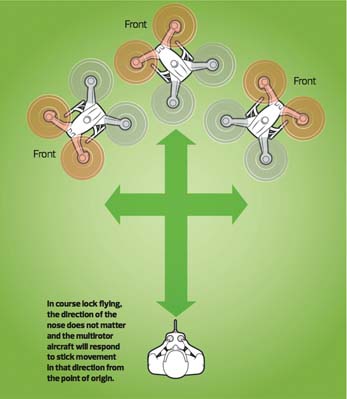
The first intelligent orientation control is called course lock flying. When the multirotor is first started, the GPS locks in on the starting point of the flight. From that point on, any stick control moved forward, backward, or to the right or left will be based off of that point regardless of the orientation of the nose of the aircraft. This allows the pilot to fly the multirotor with the nose pointed in any direction the same way they would if the nose was always pointed forward. When the control stick is move to the right, the aircraft will always move right regardless of whether the aircraft’s nose is heading toward that point or away from that point. The thing to remember here is that the aircraft will travel in a straight line. For example, if you fly straight and forward 50 yards from the starting location, then 50 yards to the right, then 50 yards backward, the aircraft will still be 50 yards to the right of the starting point. You will have to fly it 50 yards to the left to make it back to the starting point. It would not make a difference how many times you rotated the multirotor around during that flight.
This mode is good if the pilot needs to move during the flight; for example, if you happen to be filming something that is moving and you need to move to follow it. This is the intelligent orientation control to be in because all of the directions will remain the same throughout the flight.
Home Lock Flying
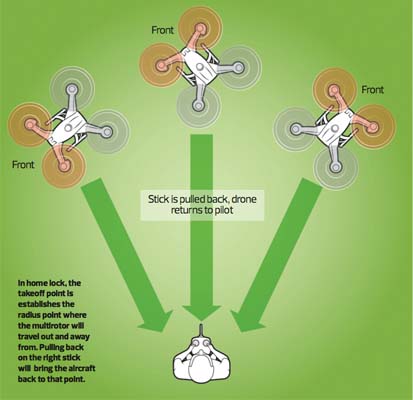
The second intelligent orientation control is called home (or home point) lock flying. The starting point is again selected by GPS when the multirotor is first started. However, every time the stick is pushed forward, the drone will fly away from that point, and when the stick is pulled back, the drone will fly back toward that point. Again, this is regardless of the orientation of the multirotor’s nose. In this mode, if you flew the aircraft out 50 yards and gave it right stick, it would fly a 50-yard circle around the home (starting) point. In our example above, if you fly 50 yards straight from the starting location, then fly 50 yards to the right, then fly 50 yards backward, the aircraft would be back at the home point.
This is a great control mode to be in if you are always going to stand in the same spot during flight. For example, if you were standing on the dock and filming surfers out on the ocean, this is the orientation control that you would use because all you need to do is pull back on the stick and your multirotor will return to that take-off point on the dock.
Conclusion
Hopefully these explanations and examples will give you a better understanding of the different flight modes and intelligent orientation controls available on many multirotor drones. In most cases, the flight modes will be on one three-position switch and the intelligent orientation controls will be set up on a different three-position switch. Take advantage of the latest in technology and make your flight experience easier to control and much more enjoyable.
By: John Reid
Illustrations by: tabletinfographics.com


Great Article!