
Get into multirotors your way! By Mike Gantt
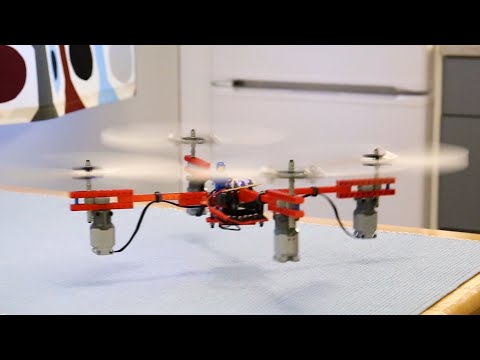
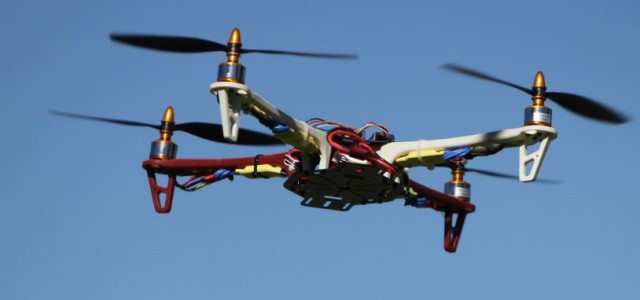
Admitting this is not easy: when the quadcopter scene blew up at my local RC flight site, I paid little, if any attention. A few weeks later there was a guy wearing First-Person View (FPV) goggles and flying one of these machines all over the place and again, little interest was generated on my end. It actually took my viewing the footage of an old, more like ancient, wooden home from an aerial perspective that sent my mind soaring. Photos aside, the gears were turning more due to the multiple possibilities of the multirotor. A short time later is when I walked into the local hobby shop and saw the HP Helis F450 Quad. It is reasonably priced and end-user configurable. This means that you can build it to suit your particular rotordrone flight orientation and education endeavors. Later you can outfit the platform with GPS, stabilization, gimbal, camera, lights, etc., for a full-blown FPV experience.
If you have never assembled a remote control aircraft before I suggest getting help from an experienced modeler, but the F450 is not at all difficult to put together. Basically a 2mm hex wrench does most of the work. The kit includes everything you’ll need to fly minus your radio gear and a 4-way power adapter, which is available separately. You’ll also need a flight battery, some wire ties, thread-lock and some hook and loop fastener.
Unique features Good news: the required LiPo battery is noted as a 3S 2200 mAh and can be found at Hobby People for around $15. Replacement parts if needed as a result of your learning curve are available there as well. Simplicity rules with the F450 assemblage and setup. The frame is set up in an “X” configuration and there are two struts in red and two in white. The manual advises you to put red in the front, but if the reverse makes more sense to you, reverse them. The bottom line is orientation. You want to easily and immediately be able to discern the front and rear of the aircraft in flight. Two phenolic sheet plates are employed and “sandwich” the strut, the larger of which resides on the bottom and serves as the battery tray. I added a drop of Bob Smith Industries blue IC-Loc to all of the fasteners, which will keep any vibrations from loosening them. I also verified that the propellers were balanced using my Du-Bro balancer, and this will help to keep the vibrations away. The included four electronic speed controls are attached to the struts with zip ties (wire ties) and the included four brushless motors connect to them via bullet plugs. The flight controller is mounted with double-sided tape and you must position it with the “front” arrow facing the front of the aircraft. In my case, the red arrow marked “front” points forward toward the two red struts. Located adjacent is plenty of room for a receiver where hook and loop was the fastening system of choice. Likewise the flight battery should be held in place with hook and loop fastener or similar. I found that some of my 3S 2200 batteries fit tight enough to omit the hook/loop connection between the airframe. Instead a battery strap can be routed through existing slots in the battery tray to secure the flight pack. Another simple option would be to add washers between the struts and battery tray for a little more space if your packs are larger than spec.
Conclusion With approximately 48 (short) fasteners to screw in, the HP F450 goes together rather quickly with only a 2mm hex wrench, and this includes tightening up the props. It is a robust quad and flies very well with good stability and impressive agility. Perfect for a beginner, this multirotor has parts support and uses low-priced LiPos. A new pilot needs only a 4-channel transmitter to fly this quadcopter and the required brushless motors and speed controls are all included.
IN THE AIR Calibrate everything as outlined in the instructions and you’re good to go. Some notes I will add are to double check things like the flight controller’s dipswitches for receiver type and multirotor type. Be sure to place the aircraft on hard, level ground when you run the setup routine. The gain dial is the one adjustment, which simplifies flight sensitivity, and it is recommended that pilots begin with a low setting. However, I have mine turned down quite a bit and see a good balance of stability and reactivity. The instructions advise against turning the gain up too much which will inevitably lead to unwanted responsiveness and over-controlling.
After booting up your radio and powering up the F450, the motors will not move until they are unlocked. This merely requires that you keep the throttle at the lowest setting and push the rudder stick to the right. Once complete, a green LED flashes, the motors come alive to idle speed and you’re ready to take to the air. After flying or at any time needed, you can lock the motors using the lowest throttle setting and left rudder input, something you want to do before attempting to unplug the battery or in a bad situation. The bottoms of the struts have short built-in landing skids, which are fine for rising off of smooth surfaces and short grass. I should mention that the power is abundant and the F450 can easily carry a decent FPV system.
Stability: The single, simple gain adjustment on the flight controller makes it easy to set this quad for stable flying. I trimmed the controls a bit and stability improved. After some trial and error, I ended up adding about 30% of exponential to the transmitter and further smoothed out my flying. The F450 holds its position well if throttle is added in gradually, and the self-leveling feature did its job. After a camera pass, the quad transitions quickly from banked to level with a little bit of energy carried over due to inertia. It was slightly windy on test flight day, but the F450 didn’t seem to mind.
Response: When first adjusting the gain dial I noted that I could make the F450 as twitchy as I wanted. Even after I backed it down during the test flights the response was not sluggish at all. After unlocking the motors, they run at idle and as you advance the throttle the props spool up quickly. You can “space shuttle” launch this quad from the ground if you want and quickly send it up into the clouds. The turns can be high banked (up to 80°) and you’ll likely be impressed with the F450’s flight agility.
SPECIFICATIONS
Name: F450 DIY Quad Kit
Manufacturer: HP Helis
Distributor: Hobby People (hobbypeople.net)
Type: X-type multi rotor
Length: 17.7 in. diagonally
Weight: 31 oz.
Radio req’d: 4+ channels
Price: $180
Highlights
-Build it your way
-Simple to set up
-Agile flight performance
Gear Used
Radio: Airtronics Aquila-6 w/ RX-71E receiver (airtronics.net), HP Super M/R Controller (hobbypeople.net)
Motors: (4) HP 2212/13T 1000Kv and (4) HP 2/3s 30A speed controls (all included)
Props: 10×4.5 (included)
Battery: Hobby People 3S 2200 30C
3 Setup Checkpoints
When setting up your F450 multirotor, here are a few things to consider for your flight success.
- Read the instructions! I know this sounds obvious, but many guys have built similar aircraft before and try to avoid reading the manual. Every new aircraft deserves the same respect and most, if not all, will have some differences. As well, you just might figure out that weird problem with only a minute or two of reading.
- Reversal: Don’t worry if your motors initially rotate the wrong way; you can always swap any two of the three wires between a motor and speed control to switch rotation direction.
- Gain adjustment: I have heard horror stories and have firsthand experience with too high of a setting. The manual states that we should begin with a lower setting, perhaps 50% or less. I found that 30% seemed best (for my flying style) for a nice balance of agility and stability.