
A time-lapse movie or video is one that speeds up real-time footage so that the viewer can quickly see what has happened. This can be accomplished in two ways. The first is to take a long video and compress it in postproduction so that you show what happened over an hour in a just a few minutes. The other method is to shoot a still image every few seconds and place the images together, one after the other, to make a video. This automatically speeds up the time in the finished video. Both options can be done with many of the drones available on the market. For this article, we’ll discuss how to shoot photos every few seconds and put them together to create a time-lapse video. The advantage of this method is that you have more control in post processing and a smaller file size (really noticeable when shooting JPEG) as well as a little longer battery life. Let’s see how it’s done.

Foreground subjects close to the drone will move a lot in windy conditions during the time-lapse sequence. Be careful when picking out your foreground interest.
Picking Your Scene
When you shoot time-lapse photography on the ground, you essentially have an unlimited amount of time for taking an image, so the time-lapse product can include hours of actual time. This long-duration shoot would not need fast movement throughout the scene because even slow movement, such as beams of light dancing across the floor, would provide enough activity in the video. With drones, however, we are limited to the length of time we can fly, which varies from drone to drone; the average is about 20 minutes of flight/shooting time. For this reason, you will need to pick a scene that has some movement that will continue for the entire 20 minutes of flight time.
Scenes that include moving people or traffic, moving water, or moving clouds are good choices. When you frame the scene, you want a foreground element that will bring the images together (this element does not need to move). A good example of this is to hover next to a large rock at the beach so that it is framed in the foreground: The rock stays in one spot, while the waves are the key moving element for the time-lapse video. The key point is to have movement in the frame over the entire flight; otherwise, you’ll just have the same shot in each frame, resulting in a very dull video.

When using the time-shot setting, set it to the fastest time, which is generally two seconds. This will give you the most frames to work with for the 20-minute flight.

Light rays coming through clouds move faster than you might think and make good time-lapse subjects.
Setup Tips
When the drone is in the air, you want to maximize that time so that the camera is shooting for the entire flight. Because of this, you should program all the camera settings when the drone is on the ground. All the settings we’ll discuss here may not be available on your drone, but use the ones that you can change.
The first choice is whether to shoot in JPEG or RAW. RAW images will give the best results if you use Lightroom to assemble your time-lapse video. If you have a slower computer, however, then you should shoot in the smaller format: JPEG. Keep the ISO low, about 100 to 200 for the best results. If you’re shooting a sunrise or sunset, you may need a higher ISO, but try not to go over 800, unless you need it for the exposure.
Using a tripod-stabilized mode (if your drone has it) will keep the drone in one spot throughout the shooting sequence. Otherwise, use your drone’s stabilization mode, but be sure to check out the footage to make sure that it is helping. On some drones, stabilization mode actually makes radical moves (especially in wind) to get back on track, and this can affect how smooth the finished video is. If your drone has a positioning or spot mode to keep it in one location, try that and see if it adds to the stabilization.
Set your camera to manual focus and exposure because you don’t want any of these settings changing from image to image; this will make a big difference in the finished video. Set the image format to 16:9 to match what the finished film will be viewed in. White balance should be set at the appropriate type of light you are in when shooting JPEG; in RAW format, you can set the balance or not, as this can be adjusted in post.
Turn on the histogram when setting up the correct exposure, and leave it on if you are shooting in changing light, such as a sunset. If you need to change the exposure during the shoot because of low light, you will know that by watching the histogram. Use manual shutter speed and set it to 1/60 if possible; depending on the amount of light, you may have to go with a much higher shutter speed. The best way to bring down the shutter speed to close to 1/60 is to add neutral-density filters to the front of the lens (there are many available for almost all the popular drones). If equipped, set the camera to mechanical shutter and to single shot/time shot. Time shot will trip the shutter at the preset time interval, and in most cases, you will want it somewhere between two and five seconds to capture the most images during the flight. One final note: Be sure to format the SD card so that it is clean and empty, with plenty of room for all the new images captured during the flight.

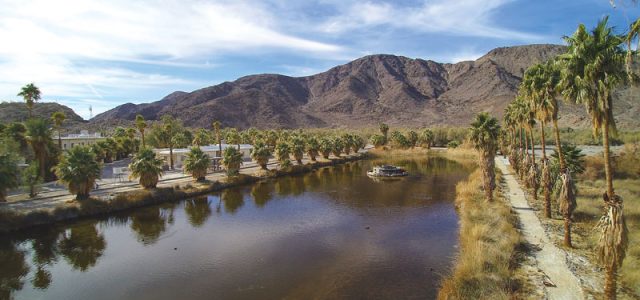
Scenes like this make for a good time-lapse video.
Flying Tips
Now that the drone is set and all the photo parameters are in place, it is time to take off and start shooting. Check a weather app to see what the wind speed is for the area in which you will be flying. No wind is best, but less than two to three miles per hour is acceptable. When flying in any type of wind, try to get a high or faraway shot so that any bobbing or movement by the drone will not be as noticeable as it would be when flying closer to the foreground object.
Plan where you want the drone to sit for the duration of the time-lapse session. Once in the air, get the drone in position as soon as possible and start shooting images. Keep your hands off the sticks! Any movement will mess up the flow of the sequence of the images you will be combining for the film. I like to sit down and place the controller in my lap or next to me so that I don’t touch anything. The process at this point will be mostly automated, so there is really no reason for any input by the pilot. This time may be quite boring as you sit there and just watch the drone, but be sure that you don’t get involved in something else and let the drone fly unsupervised.
Fly as long as you can so that the drone camera can capture as many shots as possible. If, for example, the drone flies for 20 minutes and the camera is shooting every two seconds, you will end up with about 600 photos. If you use that many photos in a video at 30 frames per second, you’ll have a 20-second clip. Because of this, if my drone is right above me, I let it go past the first low-battery warning, allowing it to fly as long as possible. But if the drone is away from me and requires some flight time back, then I won’t push it. When it is time to land, I like to turn off the camera before landing so that I don’t have images at the end that need to be deleted.

When shooting time-lapse video with people, make sure that there is constant movement through the frame. Once these two motorcycles move out of the frame, the only movement will be from the clouds in the background.
Post Work
Now that the images are set to the card, the next step is to process them into a short video clip. This can be accomplished by a number of different editing programs, such as Premiere Pro, Final Cut Pro X, After Effects, or Lightroom. I currently use LRTimelapse 4 with Lightroom. The sequence is about the same for most program workflows: make any image corrections to the photos individually, then assemble them into a video clip. I use Lightroom to correct an image, then synchronize the adjustments to the other images, and export all the photos to LRTimelapse to output and assemble the video. From here, the video may need to be warp-stabilized to eliminate any movement from the drone during the flight, and this can be done in After Effects or with most video-editing programs.

While this is a good scene for a photo, it won’t work well for a time-lapse video because there isn’t water movement or moving clouds.
Final Thoughts
Shooting time-lapse videos using a drone is not a difficult endeavor, and many drone programs now have a time-lapse feature on them to make the process even easier. But even if your drone doesn’t have that feature, all that will be required is for you, the pilot, to push the “take photo” button every few seconds for the duration of the flight. Now it’s time to go out and take that outstanding sunset time-lapse video from above. Enjoy!